Table of Contents
Apply MFA on Remote Desktop Gateway using the Network Policy Server (NPS) extension and Azure AD
Authentication Flow

- The Remote Desktop Gateway server receives an authentication request from a remote desktop user to connect to a resource, such as a Remote Desktop session. Acting as a RADIUS client, the Remote Desktop Gateway server converts the request to a RADIUS Access-Request message and sends the message to the RADIUS (NPS) server where the NPS extension is installed.
- The username and password combination is verified in Active Directory and the user is authenticated.
- If all the conditions as specified in the NPS Connection Request and the Network Policies are met (for example, time of day or group membership restrictions), the NPS extension triggers a request for secondary authentication with Azure MFA.
- Azure MFA communicates with Azure AD, retrieves the user’s details, and performs the secondary authentication using supported methods.
- Upon the success of the MFA challenge, Azure MFA communicates the result to the NPS extension.
- The NPS server, where the extension is installed, sends a RADIUS Access-Accept message for the RD CAP policy to the Remote Desktop Gateway server.
- The user is granted access to the requested network resource through the RD Gateway.
Prerequisites
- Remote Desktop Gateway (RD Gateway) infrastructure
- Azure MFA License
- Windows Server software
- Network Policy and Access Services (NPS) role
- Azure Active Directory synched with on-premises Active Directory
- Azure Active Directory GUID ID
Network Policy and Access Services (NPS) role
The NPS role service provides the RADIUS server and client functionality as well as Network Access Policy health service. This role must be installed on at least two computers in your infrastructure: The Remote Desktop Gateway and another member server or domain controller. By default, the role is already present on the computer configured as the Remote Desktop Gateway. You must also install the NPS role on at least on another computer, such as a domain controller or member server. For information on installing the NPS role service Windows Server 2012 or older, see Install a NAP Health Policy Server. For a description of best practices for NPS, including the recommendation to install NPS on a domain controller, see Best Practices for NPS.
- Virtual machine creation, required to host the NPS role.
- NPS role installation.
- NPS extension for Azure installation.
Install NPS Role for NPS Extension server
The next steps will install the NPS role in your new server:
- Open Server Manager and click Manage, then click Add Roles and Features.
- On the Before you begin page, click
- On the Select Installation Type page, click Role/Feature Based Install and then click
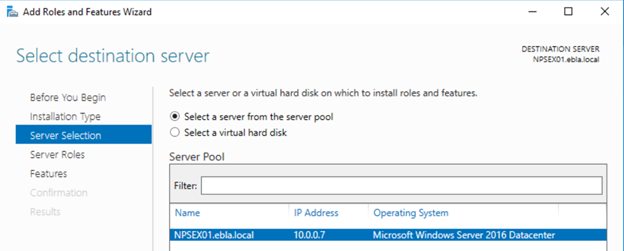
- On the Select destination server page, click Select a server from the server pool, click the name of the new server where you want to install NPS, then click Next.
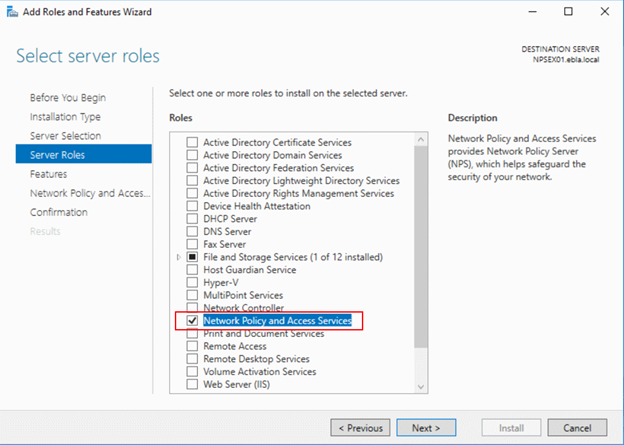
- On the Select Server Roles page, click Network Policy and Access Services, and then click Next three times. On the Select role services page, click Network Policy Server, and in the Add Roles and Features Wizard dialog box, verify that Include management tools (if applicable) is selected, click Add Features, and then click Next.

- On the Select features page, click .NET Framework 3.5 Features, then click Next.
- On the Confirm installation selections page, click Install.

- Installation will take a few minutes to complete. On the Installation Results page, verify that the installation was successful, and then click Close.

As a part of the configuration of the NPS extension, you need to supply admin credentials and the Azure AD ID for your Azure AD tenant. The following steps show you how to get the tenant ID:
Get Azure AD ID
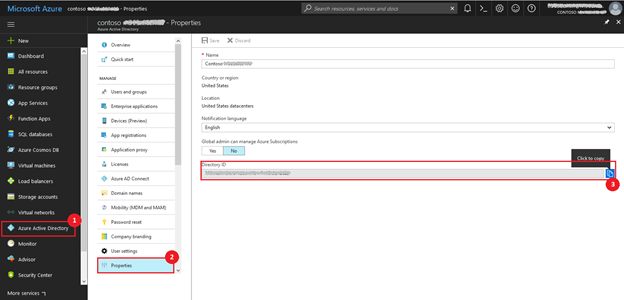
- Sign in to the Azure portal (https://portal.azure.com) as the global administrator of the Azure tenant.
- In the left navigation, select the Azure Active Directory
- Select Properties.
- In the Properties blade, beside the Directory ID, click the Copy icon, as shown below, to copy the ID to the clipboard.
Install the NPS extension
- Copy the setup executable file to the NPS server.
- On the NPS server, double-click the executable. If prompted, click Run.
- In the NPS Extension for Azure MFA dialog box, review the software license terms, check I agree to the license terms and conditions, and click Install.
- On the NPS Extension for Azure MFA dialog box, click Close.In this step, you need to configure certificates for the NPS extension to ensure secure communications. The NPS components include a Windows PowerShell script that configures a self-signed certificate for use with NPS.This script performs the following actions:
Configure certificates for use with the NPS extension
- Creates a self-signed certificate
- Associates public key of the certificate to service principal on Azure AD
- Stores the cert in the local machine store
- Grants access to the certificate’s private key to the network user
- Restarts Network Policy Server service
To use the script, provide the extension with your Azure AD Admin credentials and the Azure AD tenant ID that you copied earlier. Run the script on each NPS server where you installed the NPS extension. Then do the following:
- Open an administrative Windows PowerShell prompt.
- Execute the command cd ‘c:\Program Files\Microsoft\AzureMfa\Config’.
- Execute the command .\AzureMfaNpsExtnConfigSetup.ps1. the script checks to see if the Azure Active Directory module is installed, if not, the script installs the module for you.
- After the script verifies the installation of the PowerShell module, it displays the Azure Active Directory PowerShell module dialog box. In the dialog box, enter you Azure AD admin credentials and password, and click Sign In.
- When prompted, paste the tenant ID you copied to the clipboard earlier, then press Enter.
- The script creates a self-signed certificate and configures this portion of NPS. The output should be similar to the image shown below.


Install RD Gateway Server
The next steps will install the NPS role in your new server:
- Open Server Manager and click Manage, then click Add Roles and Features.
- On the Before you begin page, click
- On the Select Installation Type page, click Role/Feature Based Install and then click
- On the Select destination server page, click Select a server from the server pool, click the name of the new server where you want to install NPS, then click Next.
- On the Select Server Roles page, click Remote Desktop Services, and then click Next.


- On the Confirm installation selections page, click Install.
- Installation will take a few minutes to complete. On the Installation Results page, verify that the installation was successful, and then click Close.

Configure NPS components on RD Gateway server
Once you have an NPS server running on your RDS environment, you need to configure the RD Gateway connection authorization policies to work with the NPS server. The authentication flow requires that RADIUS messages be exchanged between the RD Gateway and the NPS server. This means that RADIUS client settings must be configured on both RD Gateway and NPS server.
Remote Desktop connection authorization policies (RD CAPs) specify the requirements for connecting to a RD Gateway server. By default, RD CAPs are stored locally, and MFA requires that they be stored in a central RD CAP store that is running NPS. Follow the steps below to configure the use of a central store.
Configure RD Gateway connection authorization policies to use a central store
- On the RD Gateway server, open Server Manager.
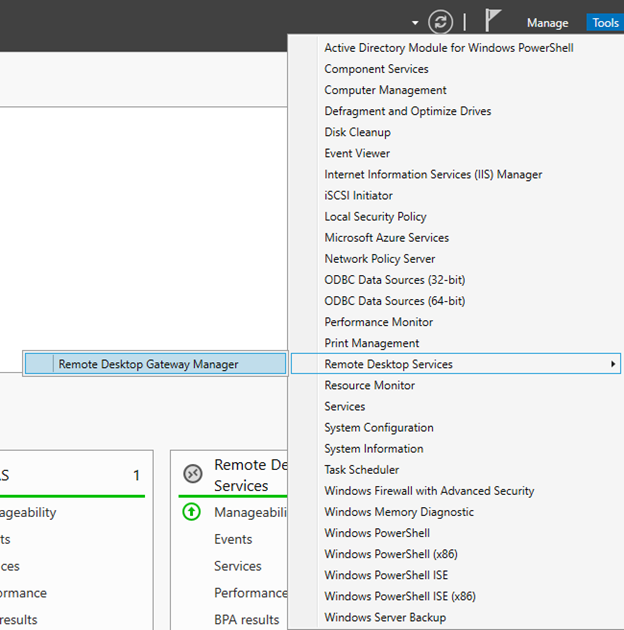
- On the menu, click Tools, point to Remote Desktop Services, and then click Remote Desktop Gateway Manager.
- In the RD Gateway Manager, right-click [Server Name] (Local), and click Properties.
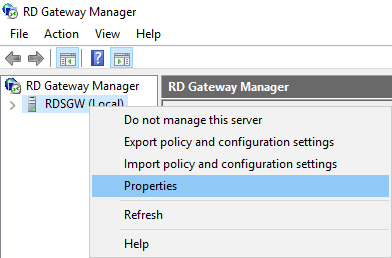
- In the Properties dialog box, select the RD CAP Store
- On the RD CAP Store tab, select Central Server running NPS.
- In the Enter a name or IP address for the server running NPS field, type the IP address or Fully Qualified Domain Name (FQDN) of the NPS server. Click Add.

- In the Shared Secret dialog box, enter a shared secret, and then click OK. Make sure you record this shared secret and store the record securely.
- Click OK to close the RD Gateway Properties dialog boxYou must define an NPS client on the RD Gateway server to allow it to communicate to the NPS server with the NPS extension.
Configure RADIUS client on RD Gateway NPS
- On the RD Gateway server, in Server Manager, click Tools, and then click Network Policy Server. In the NPS (Local) console, expand RADIUS Clients and Servers, right-click RADIUS Clients, and then click New.
- In the Add RADIUS Server dialog box, type the FQDN for the RD Gateway server, and click Verify…. Make sure that the server name is correct, and click OK.

- Select the newly added RADIUS server, then click Edit.
- In the Load Balancing tab, in the Number of seconds without response before request is considered dropped and Number of seconds between requests when server is identified as unavailable fields, change the default value from 3 to a value equal to or greater than 60 seconds. Make sure to use the same values you set previously when configuring the RADIUS timeout on the RD Gateway server.
- Click OK.

Create connection request policies
Just like with the RD Gateway server, you must define policies to handle messaging exchange to/from the RD Gateway server.
Create “From RD Gateway” connection request policy
- On the NPS server, in the NPS (Local) console, expand Policies, right-click Connect Request Policies, and select New.
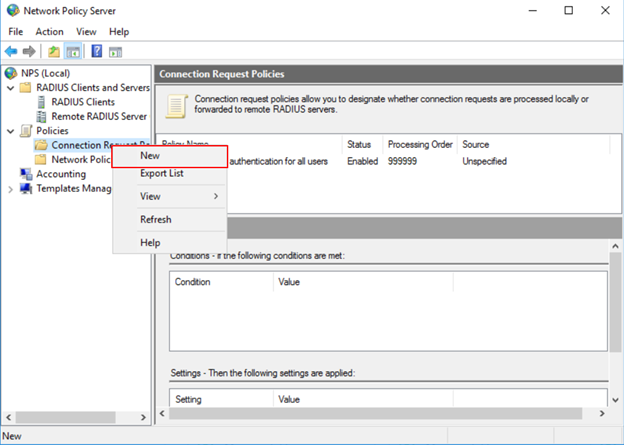
- In the Policy name field, type From RD Gateway.

- In the Type of network access server box, select Remote Desktop Gateway. Then click Next.
- In the Conditions dialog box, click Add…, select Client Friendly Name. Then click Add.
- In the Client Friendly Name dialog box, type the same friendly name you used previously when defining the RADIUS Client on the NPS server. Click OK to close the dialog box, and then click Next.

- In the Authentication settings, make sure you leave the default value of Authenticate requests on this server. Then click Next.

- Click Next two more times to leave all the other settings with their default values. Finally click Finish to create the policy.
- Make sure that the policy details look like the picture below:

Create “To RD Gateway” connection request policy
- On the NPS server, in the NPS (Local) console, expand Policies, right-click Connect Request Policies, and select New.
- In the Policy name field, type To RD Gateway.
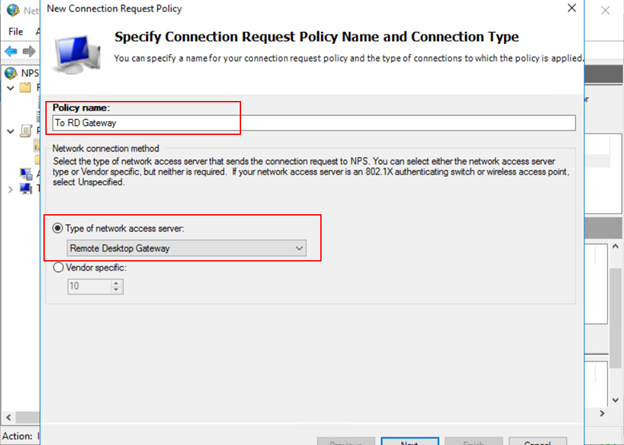
- In the Type of network access server box, select Remote Desktop Gateway. Then click Next.
- In the Conditions dialog box, click Add…, scroll to the bottom and select NAS Port Type. Then click Add.
- In the NAS Port Type dialog box, check Virtual (VPN). Click OK, then click Next.


- In the Authentication settings, select the option Forward request to the following remote RADIUS server group authentication, and select the RADIUS server group available from the list.

- In the Accounting settings, check the option Forward accounting requests to this remote RADIUS server group, and select the RADIUS server group available from the list. Then click Next.

- Click Next to leave the other settings with their default values. Finally click Finish to create the policy.

- Make sure that the policy details look like the picture below:
 Once you have added the two new policies, you need to ensure that the policies’ status and processing order are correct. Your policy list should look like the picture below:
 Because the NPS server with the MFA extension was designated as the central policy store for RD CAPs, you need to implement a new policy on the NPS server to authorize valid connections requests.
Configure Network Policy
- On the NPS server, in the NPS (Local) console, expand Policies, and click Network Policies.
- Right-click Connection to other access servers, and click Duplicate policy.

- Right-click Copy of Connections to other access servers and click Properties.

- In the Copy of Connections to other access servers Properties dialog box, in Policy Name, enter a suitable name, such as RDG_CAP. Check Policy Enabled, and select Grant access. Additionally, in Type of network access, select Remote Desktop Gateway.

- Click the Constraints tab and check Allow clients to connect without negotiating an authentication method.

- Optionally, click the Conditions tab and add conditions that must be met for the connection to be authorized, for example, membership in a specific Windows group.


- Click OK. When prompted to view the corresponding Help topic, click No.
- Ensure that your new policy is at the top of the list, that the policy is enabled, and that it grants access.To verify the configuration, you need to connect to your RD deployment through the RD Gateway server. Be sure to use an account that is allowed by your RD CAP.

- Open any of the available resources It may ask you to enter your credentials.

- After granting access, the remote desktop connection should resume.


Hardware Requirements
Physical/Virtual Servers:
Server | Software | Memory | CPU Cores(1) | Local Disks | Ext Storage Access | Network Cards | Count |
NPS Server role | Windows 2016 Standard | 8 GB | 4 core x64 | 100 GB | No | 1 | 2 |
Remote Desktop Gateway server | Windows 2016 Standard | 8 GB | 4 core x64 | 100 GB | No | 1 | 2 |
References
The following articles are references used in this design document:
| Title | Reference |
| Azure Active Directory | |
| Custom Domain Name | |
| Integrate your Remote Desktop Gateway infrastructure using the Network Policy Server (NPS) extension and Azure AD | |
| Remote Desktop Services – Multi-Factor Authentication | |
| Add high availability to the RD Web and Gateway web front | |
| Remote Desktop Services – High availability | |
| Integrate your existing NPS infrastructure with Azure Multi-Factor Authentication |

